What It's For
Bill Payments lets you process carrier bill payments (Simple Mobile, T-Mobile, etc.) and track them for accounting.
Where to Find It
Sidebar → Bill Payments
How To: Process a Bill Payment
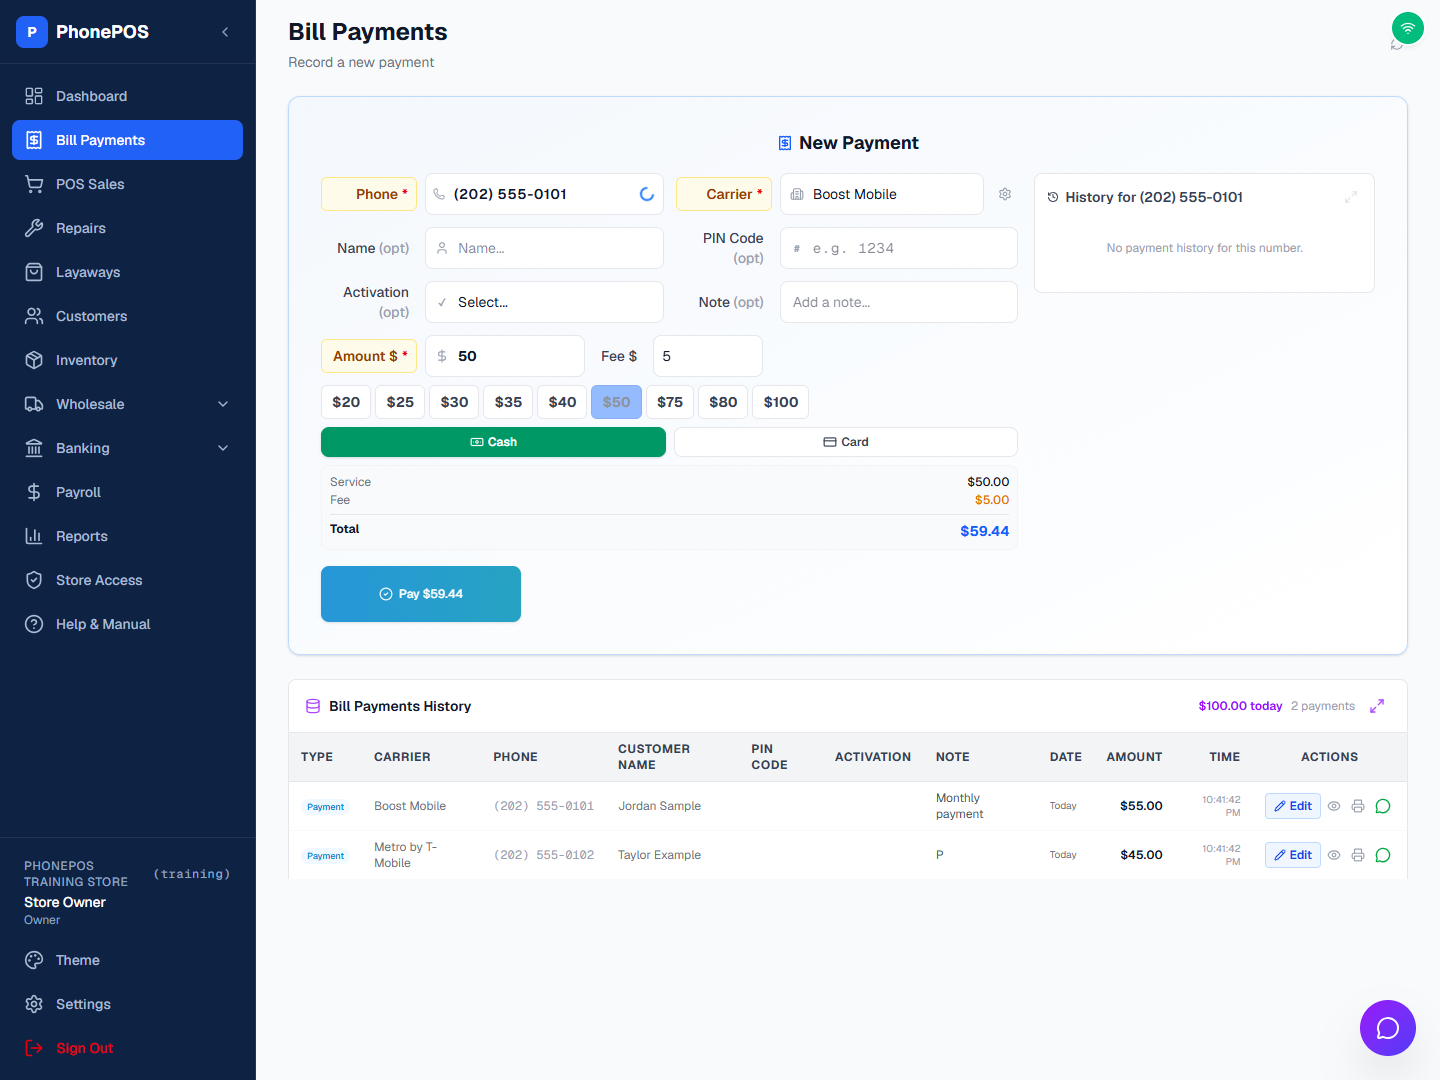
The Bill Payments page opens directly on the New Payment form (Record a new payment).
- Enter the customer's Phone number (required)
- Select the Carrier (required) — the dropdown shows your store's carrier list (Settings → Fees & Commission → Carriers). Click the small gear icon next to the Carrier field to open Fees & Commission and edit carriers. Each store keeps its own list and never sees another store's carriers.
- (Optional) Enter Name, PIN Code, Activation, and Note. Selecting Yes for Activation reveals the optional Activation Fee field.
- Enter the Amount (required) — or use the quick buttons ($20, $25, $30, $35, $40, $50, $75, $80, $100). You can also add a Fee and toggle Tax on/off
- (Optional) Enter a phone number in the History panel to look up that customer's past payments
- Click Cash or Card, then click Pay to complete the payment
Carrier PIN Code (Optional)
The PIN Code (opt) field in Bill Payments is a carrier/payment PIN, not the employee's Quick PIN Login.
- Enter the customer's PIN only when needed. Leaving the field blank is allowed.
- The saved PIN appears in Bill Payments History and in the final screen and paper receipt, including reprints. Leading zeros such as 001234 are preserved.
- If no PIN is entered, the receipt does not show a PIN line. Ask for the customer's consent before recording or printing a PIN.
Activation Fee (Optional)
- No (default): The Activation Fee input stays hidden, and no activation charge is added.
- Yes: An optional Activation Fee amount field appears. Blank or zero leaves the total unchanged.
- Enter a positive amount to add it separately from the regular payment fee and tax. Example: $50 bill + $2 regular fee + $12.35 activation fee = $64.35, before tax or discount.
- Switching back to No hides the field, clears its value, and removes the charge.
- If Activation is Yes, the activation fee appears separately on the final screen and paper receipt (including $0.00). If No, that line is omitted. Reprints use the saved amount.

Illustrative screenshot using fictional payment information.

Illustrative receipt; actual printing follows store settings.
What Happens After
- The payment appears in the Bill Payments History table at the bottom of the page
- It appears in Reports
- The customer's transaction history is updated
Tips
- Quick amounts: Use the preset buttons for common amounts
- History lookup: Enter a phone number in the History panel to see past payments for that customer
- Reprint: Go to History → find the payment → click Print
Managing Carriers for Bill Payments (Add / Delete)
The Carrier dropdown in Bill Payments shows your store's carrier list. Each store keeps its own isolated list — you will never see another store's carriers.
Bill Payments — New Payment form showing the Carrier dropdown and gear icon.
Two ways to manage carriers:
A) From the Bill Payments form (quick access):
- Open Bill Payments.
- Next to the Carrier field, click the small gear icon (Settings). You will be taken to Settings → Fees & Commission → Carriers.
- Follow the steps in (B) below, then click Save Changes.
B) Directly in Fees & Commission:
Go to Settings → Fees & Commission.
Scroll below the fee and tax settings to the Carriers section. You will see:
- An input with placeholder "Add carrier..." and an Add button.
- Current carriers shown as chips, each with an X to remove (e.g., "Verizon ×").
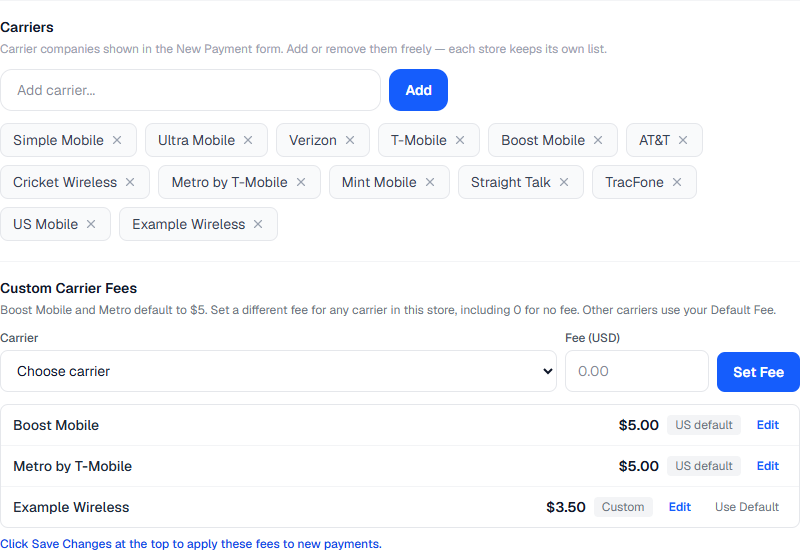 Settings → Fees & Commission → Carriers — Add input, carrier chips with delete X, and Save button.
To add a carrier:
- In Settings → Fees & Commission → Carriers, type the carrier name (e.g., "Simple Mobile") in Add carrier....
- Press Enter or click Add. The name is trimmed; empty names are ignored; duplicates are not added.
- The new chip appears immediately in the list.
- Click the main Save Changes button at the top right of Settings to persist.
To delete a carrier:
- In the chip list, click the X on the carrier you want to remove. It disappears from the list immediately.
- Click Save Changes to persist. If you delete the last chip, "No carriers yet. Add one above." is shown. The Bill Payments form will then show the default carrier list until you add and save at least one custom carrier.
Permissions:
- Viewing the carrier list — any authenticated store member.
- Adding / Deleting / Saving — Owner, Admin, or Manager only. Staff receive 403 Forbidden.
Delete confirmation: The UI deletes the chip immediately on X click without a separate confirmation dialog; the final confirmation is the Save Changes action. If you need a confirmation, cancel by not saving and refreshing the page before saving.
Custom fees for each carrier
In Settings → Fees & Commission, the Custom Carrier Fees section is directly below the carrier list.
- Choose a carrier and enter a fee, such as 3.50. Enter 0 for no fee.
- Click Set Fee. This stages the change on the settings screen.
- Click Save Changes at the top of Settings to apply it.
- Open New Payment and select the carrier. The fee fills in automatically.
For a United States store, Boost Mobile and Metro by T-Mobile default to $5.00. Other carriers use Processing Fee Per Transaction unless you set a custom fee. A saved custom fee takes priority over both defaults. The automatic $5 defaults do not apply to Canadian stores.
Use Edit beside a fee to change it. Use Use Default, then Save Changes, to remove an override. Boost and Metro return to $5 in a US store; other carriers return to the store's processing fee. Fee changes apply to new payments; they do not rewrite historical payments. The fee can also be adjusted for an individual payment before saving it.
How To: Search payment history
Use Bill Payments → Bill Payments History, or Dashboard → History → Payments History. Both search all saved payments in the current store, including older CellSmart imports.
- Choose Search by: All fields, Customer name, Phone number, Carrier, Note / Payment ID, or Activation.
- Enter the value. Searches ignore letter case. Phone numbers work with spaces, parentheses, dashes, and a leading +1; a partial phone number also works.
- Optionally set From date and To date. Both selected days are included. Leave either date empty for an open-ended range.
- Click Search or press Enter. The matching count and pages update, starting at page 1.
- Use Payment type to show Payments, Imports, or Refunds. Use Clear to remove the search text and dates; the payment-type selection remains available separately.
- Export Excel on Bill Payments, or Export CSV in History, downloads every matching payment across all pages. Refresh reloads saved data; the expand icon opens a larger view.
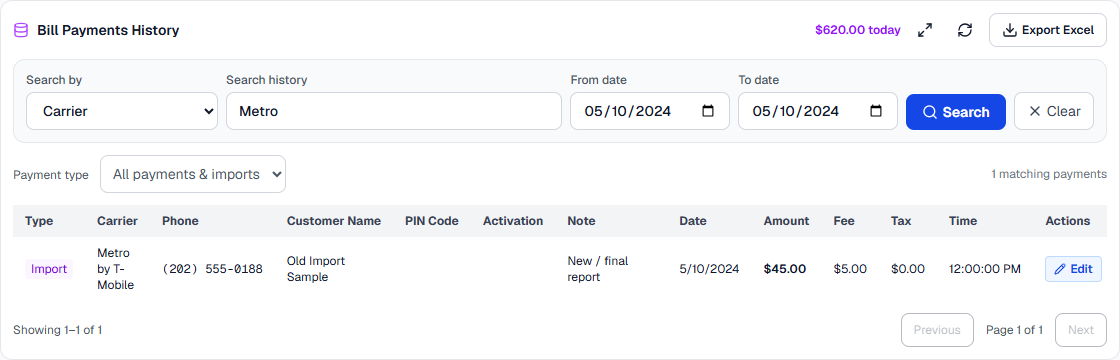
Search uses the same date shown in the payment table. Changing filters never changes a payment. If no records match, clear the filters or try another field. If loading fails, use Retry; an error is not a confirmed empty result.
How To: View daily, weekly, monthly, and yearly totals
Use Today, This Week, This Month, or This Year above the history table. The period applies immediately and works with your search text and payment-type filter. All Time removes the date restriction while keeping your search. Custom Date lets you choose any day or date range; click Search to apply it. Weeks run Monday through Sunday. Both dates in a custom range are included.
The Totals for all matching records panel below the table shows the transaction count, bill amount, fees, tax, and completed total. It includes every matching page and both native payments and imports. Refunded records are shown separately and excluded from the completed total; other non-completed records are also excluded. Editing a payment refreshes these totals.
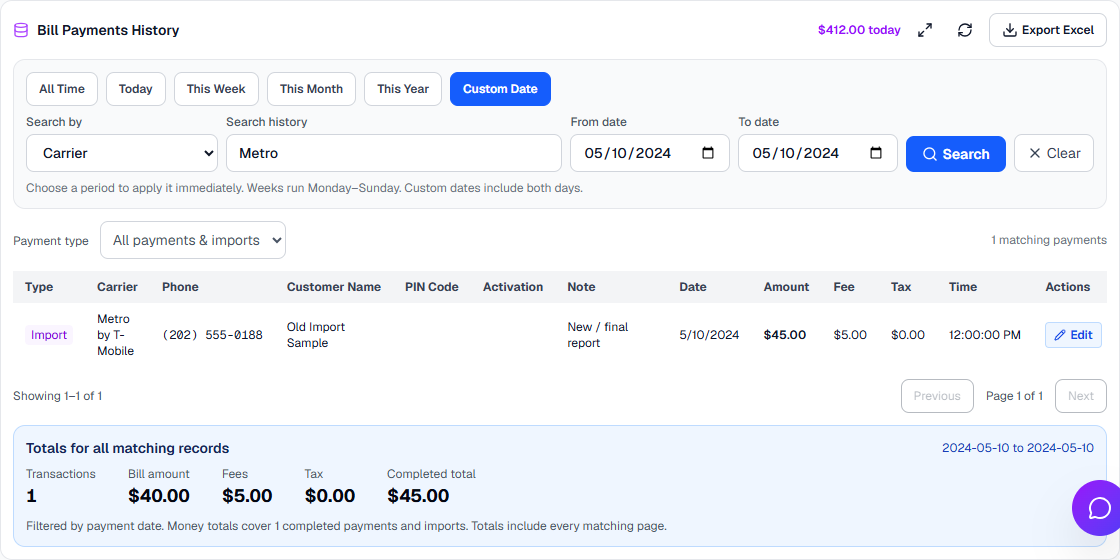
How To: Edit payment history
Owners, Store Admins, and Store Managers can correct completed payments recorded in PhonePOS and completed imported bill payments.
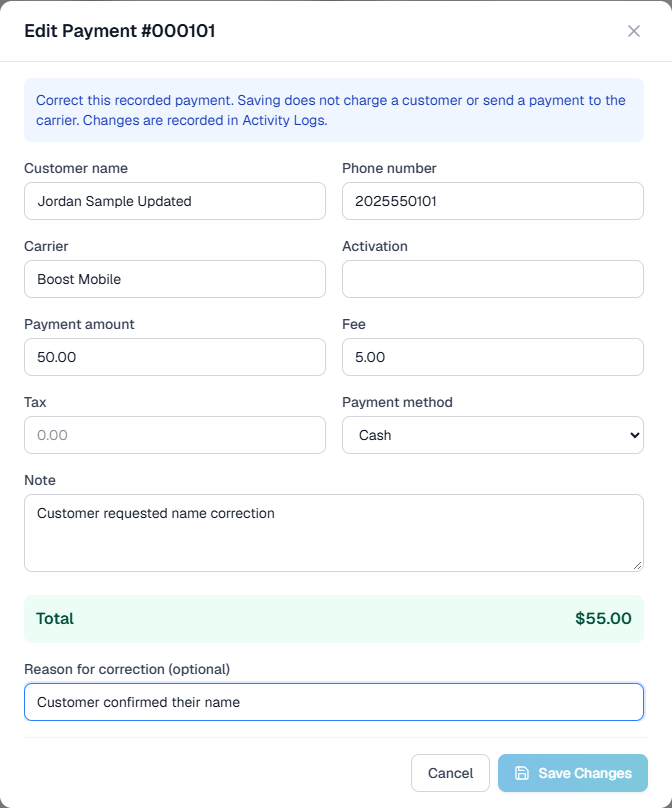
- Find the payment in Bill Payments History or Payments History and click Edit.
- Correct the customer name, phone, carrier, activation, note, payment amount, fee, tax, or payment method as needed.
- Review the recalculated total and add an optional Reason for correction.
- Click Save Changes and wait for the success message. PhonePOS saves the record and reads it back to verify the changes.
- Reopen the record or use Print to see the current saved information.
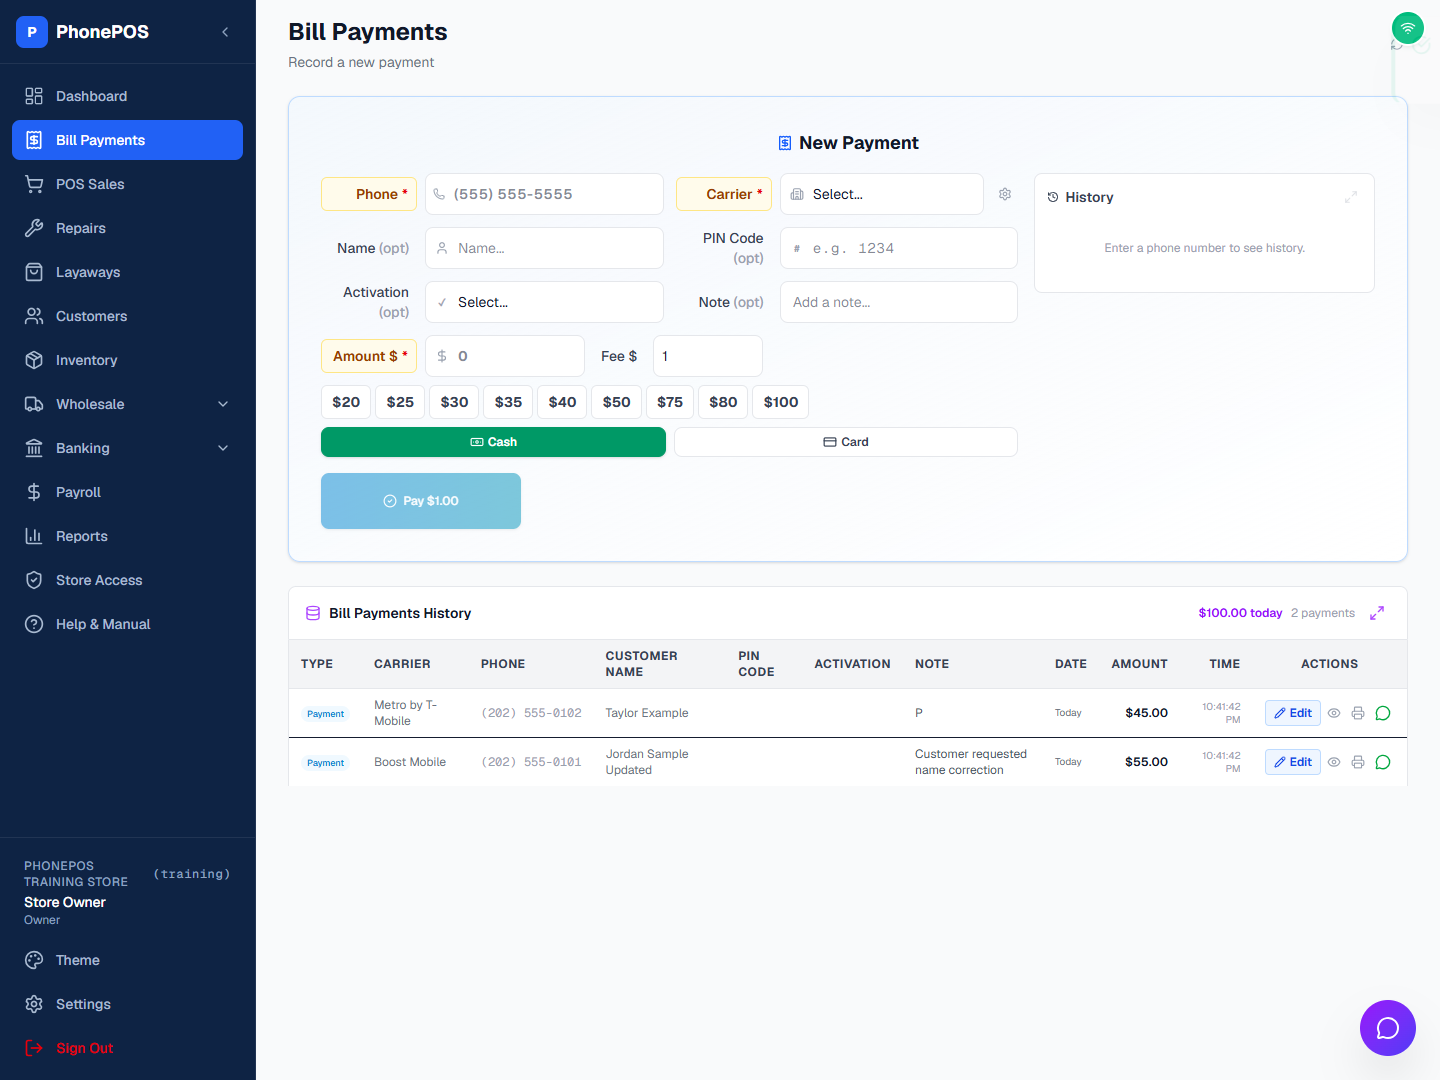
Editing corrects the recorded history; it does not charge the customer or send money to a carrier. Use the actual values that should be on the record. Completed payment corrections are logged with who changed them, when, and the old and new values. Cash corrections update affected drawer calculations where applicable. Refunded or other non-completed payments cannot be corrected through this editor.
If another user changes the payment while you are editing it, use Reload payment, review their changes, and try again. Do not assume a save succeeded if an error is shown.
Finding imported payments and notes
Search with the customer's full phone number; common phone formatting is normalized for lookup. Imported payments and PhonePOS payments appear in the history for that number. The Note column is shown in both bill-payment history and payment history. When a CellSmart Payment Id was imported into Note, its text (for example P or New) is preserved; an empty value stays empty.